Fedora Core 1 (or RedHat Linux 9) on
the HP Compaq NX7000
History
Copyright
Other links of great interest
Overview
Official
specifications
Things working
Things not working
Things not tested
Hardware listings
Introduction
Snapshots
BIOS - System ROM
Multiboot
Installing
the
Fedora Core 1 Linux distribution
Kernel
Power button
XFree86
Graphics
Video mode utilities
ATI
utility
My
utility
DRI
Keyboard
Standard
keys
VGA video out control key
Suspend to disk (hibernation)
control key
LCD brightness control keys
Other special control keys
Mouse pad
Mouse
Screenlock
Wired ethernet network
Wireless ethernet network
AMR modem
IDE
PCMCIA and CardBus
Sound
USB 1.1 and 2.0
IEEE 1394a
Y/C
Fast InfraRed
SD Card
GNU Free Documentation
License
History
0.1 - 31/10/03 (RedHat 9):
0.2 - 01/11/03:
0.3 - 04/12/03 (Fedora Core 1):
0.4 - 05/12/03:
0.5 - 08/12/03:
0.6 - 09/12/03:
- Pre-versions.
1.0 - 11/12/03:
- First public version.
Copyright
Copyright (c) 2003 - Université
de Technologie de Compiègne - Service Informatique - Marc
Villegas - Marc dot Villegas at utc dot fr
Permission is
granted to copy, distribute and/or modify this document under the terms
of the GNU Free Documentation License, version 1.2 or any later version
published by the Free Software Foundation; with no invariant sections,
no front-cover texts, and no back-cover texts. A copy of the license is
included in the 'GNU Free Documentation License' section of this document.
Other links of great
interest
Please, consider reading the following documents too:
Linux
on HP Nx ... Forum (very interesting but in german)
Linux
on HP Compaq NX7000
RedHat 9.0 on a
HP-Compaq nx7000
Linux
on Laptops
TuxMobil - Linux compatibility guides for laptops, notebooks,
PDAs, mobile phones and GPS devices
Overview
Official
specifications
You could find
HERE the official specifications of
the HP Compaq NX7000 laptop.
Things
working
Following are the pieces of hardware
that are supported and working with an Alan
Cox AC4 2.4.22 patched kernel:
- ACPI:
- battery, external power source,
- LID switch (switch on/switch off the LCD backlight),
- poweron/poweroff switch button (software poweroff with 'acpid').
- SpeedStep/cpufreq (tested with 'cpudyn'),
- IDE (with DMA activated on internal harddisk and combo drive),
- XF86:
- Graphics (1280x800x24),
- DRI (accelerated OpenGL),
- 16/10 or 4/3 video modes (normal or virtual video modes),
- VGA external video output (mirror or extended video modes),
- XVideo overlay extension for viewing DVDs (on laptop LCD screen
only),
- Volume control keys,
- Keyboard:
- Standard keys,
- Special control keys (WWW, screenlock, brightness, play,
stop, previous, next).
- Mouse and scroll pad,
- Mouse and scroll pad switch button,
- External USB mouse.
- Ethernet:
- Wired connection (tested with a 100Mb/s full duplex switch),
- Wireless connection (tested with a 11Mb/s 802.11b bridge using
WEP encryption, needs for now a commercial linux driver).
- USB:
- USB 1.1 (tested with a scroll mouse),
- USB 2.0 (tested with a DVD recorder and a flash memory key).
- FireWire 1394a (tested with an iPod used as a mass storage
device),
- Sound:
- Input (tested with an analogue microphone),
- Output (tested with internal JBL Pro speakers and external
headphone).
- Combo CDR/DVD drive:
- CD:
- reading (tested with CDROM, CDAUDIO, CD-R, CD-RW),
- writing (tested with CD-R, CD-RW).
- DVD (tested with DVD-Video, DVD-ROM, DVD-R, DVD+RW),
- Modem (tested with a V90 remote access server).
Things
not working
- SD Card reader (lack of Linux support due to license constraints),
- XF86:
- Y/C external video output (tested with 2 european/PAL/SECAM
TVs, perhaps it would work with other TV sets),
- Blue LED when the mute button is switched on (works with ALSA
sound system),
- Keyboard:
- Special control keys:
- external VGA video output key (works in console mode),
- 'suspend to RAM' key.
Things
not tested
Due to lack of time
or hardware, I haven't tested the following hardware devices or
software functionalities:
- Parallel port (drivers OK),
- PCMCIA/CardBus slot (drivers OK),
- Fast InfraRed controller (drivers OK),
- Suspend to disk (kernel patch available HERE).
Hardware listings
See below some informations about the hardware
configuration detected at boot time by Linux:
Introduction
Please, don't blame me for my bad english. This is
not my native language ;-))
The HP Compaq
NX7000 is a professional laptop built with no compromise. It is
based on the Intel Centrino technology with a promise of a more than
five hours battery life for only 3 Kg.
It is VERY SIMILAR to the Compaq Presario X1000 laptop. I
think only
very few details differ from these two machines, that's why all owners
of the Compaq Presario X1000
should
read this documentation if they plan to install Fedora Core 1 (or RedHat Linux 9) on it (the HP Compaq
NX7000 was tested first with RedHat Linux 9 before switching to Fedora
Core 1. And all the parts of this article remain valid if you plan to
install RedHat Linux 9).
It can
be ordered with a WSXGA (1680x1050) or a WXGA (1280x800) LCD screen. No
matter the
previous resolutions, the screen is a high quality 15.4-inch colour TFT
with a 16/10 aspect ratio.
Also, you should note that the NX7000 keyboard is a great piece of hardware. It is
comfortable and practical, with a great soft feedback.
Located in the top side, you will find the
poweron/poweroff switch button, two green LEDs (capitals lock on/off,
numeric keypad lock on/off), a LID switch (laptop screen
opened/closed), two JBL Pro speakers (and yes, they sound good!), three
sound volume control
buttons (volume up, volume down, mute/unmute with blue LED), a mouse
and scroll pad, two mouse buttons, a switch button with an associated
green LED used to activate/inhibit the mouse and scroll pads (using an
extrenal mouse does'nt inhibit automatically the mouse and scroll pads).
Located in the front side, you will find a Secure
Digital connector (SD Card i/o), a minijack connector for audio input
(microphone), a minijack connector for audio output (headphones or
amplified speakers), three green LEDs (power on/off, ide i/o activity,
external power source on/off), a blue LED (internal bluetooth and wi-fi
on/off), a switch button used to poweron/poweroff the internal
bluetooth (USB) and 802.11b (mini-PCI) Wi-Fi radio devices.
Located in the right side, you will find an IrDA
sensor (Fast InfraRed serial i/o), a power plug (external power source
input), and a Kensigton lock hole.
Located in the left side, you will find a
DVD/CDR/CDRW combo drive (QSI SBW-241 VH04, it could be another
manufacturer model with the same performance), and a PCMCIA/CardBus
slot.
Located in the back side, you will find an
IEEE-1394a
4 pins connector (FireWire 400 connector without
the 2 power lines), an USB connector (USB 1.1/2.0 i/o), a DB25F
connector (parallel i/o), a RJ11 connector (AMR
modem i/o), a RJ45 connector (ethernet 10/100 Mb/s i/o), two additional
USB connectors (USB 1.1/2.0 i/o), an ushiden connector (Y/C video
output), and a DBHD15F connector (VGA output).
Located in the bottom side, you will find a
removable battery (lithium-ion), a removable realtime clock battery
(lithium), a removable SO-DIMM RAM card (or two if you purchased
another one as an upgrade), a removable mini-PCI wi-fi radio card
(Intel Pro/Wireless 2100) and a removable IDE harddrive (40 GB in this
entry model).
In France,
the box contains a modem to telephone cable, several user manuals, a
WXP Pro
license, and the following CDs:
- Operating System CD Microsoft Windows XP Professional SP1 French,
- Operating System CD Microsoft Windows XP Professional SP1 English,
- Driver Recovery CD Microsoft Windows XP (Contains software and
drivers for system restore),
- Norton AntiVirus 2003 French,
- Norton AntiVirus 2003 English,
- Documentation Library HP compaq notebook series nx7000,
- Documentation Library Bluetooth.
The laptop comes preinstalled with WXP Pro SP1.
Note: this
document is a consolidation of a one month work university project
consisting of testing, preparing, and deploying more than 200 HP Compaq
NX7000 for students. The full package consists of a multiboot
(WXP Pro/Fedora Core 1 Linux) laptop, a wireless lan and a student
hotline. The project went into production in mid-november 2003.
Snapshots
A
snapshot showing the laptop
driven by RedHat Linux 9 can be seen HERE.
A snapshot showing the laptop driven by Fedora Core
1 can be seen HERE.
BIOS - System ROM
The laptop was purchased with the F.09 A version of
the
BIOS - System ROM. Now it carries the F.10
version without any trouble.
You will find HERE
the latest HP Compaq NX7000 software upgrades.
Multiboot
How to make a multiboot system?
Well, first you have to
decide what you want. Because I don't know what you want, I take an
example and develop it from scratch. You should adapt this example to
match your needs.
After reading the whole section, you will have all the material to do
it
yourself.
What I want:
- a shrunk but factory preserved Windows XP Pro
partition
- a complete Fedora Core 1
system with a 'root',
a 'swap'
and a 'usr'
partition
- a 'shared' FAT partition for file sharing between WXP Pro and
Linux.
Starting from
scratch, I consider that you
received your laptop these days.
Now, PLUG IT
to the EXTERNAL POWER SOURCE.
Don't try to make the following operations with only battery
power source!
If you worked with your laptop one hour, one week,
one month
or more before reading this documentation, BACKUP ALL YOUR IMPORTANT WINDOWS XP
DATA on a removable or external media and MAKE A COMPLETE HARD DRIVE DEFRAGMENTATION.
A disk defragmentation could destroy all your data in case of a bug in
the software or a hard drive problem. You have been warned!
You can also REINSTALL
WINDOWS XP Pro from scratch using the original HP Compaq NX7000
CDs if you want to make a cleaner install.
So, your laptop is now defragmented or reinstalled
from scratch or factory installed.
If it is on, just power it off.
If it is off, just do nothing ;-)
Take a sheet of
paper, a pen, and try to define, using a nice drawing, the size and
location of the different partitions you need. Normally, you have a 40
GB harddrive. This is a lot of space to make a multiboot system.
Below you will find my partition drawing. Try to
adapt it to your needs following these simple rules:
- for proper operation, don't
modify the start location
of
the factory installed WXP Pro
('C:\') partition: it must
remain unmodified.
- for simplicity, don't modify
the location of the Linux root ('/')
partition.
- for proper operation, size
your Linux swap partition at
least as large as your main memory.
- for performance issues, if you use a Linux usr ('/usr') partition, and/or
a shared ('/exchange')
partition, put it/them after the 'swap'
partition.
---------------------------------------------------------------------
| WXP Pro
'C:\' (HPFS/NTFS, factory installed but shrunk to, 17.5 GB) |
---------------------------------------------------------------------
| Linux root '/'
(Linux,
1GB)
|
---------------------------------------------------------------------
| Linux swap
(Linux swap, 768
MB)
|
---------------------------------------------------------------------
| Linux usr
'/usr' (Linux, 15
GB)
|
---------------------------------------------------------------------
| Linux
'/exchange' and WXP Pro 'D:\' (FAT32,
4GB)
|
---------------------------------------------------------------------
Now, you have to shrink
WXP Pro to 17.5 GB.
For this purpose, you can
use the 'ntfsresize'
and 'fdisk'
commands contained in the 'NTFS Crash Recovery Kit' CD.
You can also use a recent/decent version of 'Partition Magic',
but I have not tested it, so check
the Internet to see if it is capable of resizing WXP Pro SP1 system partitions. Of
course, this solution is not freeware...
If you choose the 'freeware way' of doing the
resizing, follow the two steps procedure below.
First, we must resize
the WXP Pro filesystem:
- poweron your laptop and login under Windows XP Pro,
- download the compressed (ZIP format, 28 832 342 bytes) ISO image HERE,
- uncompress it and burn it as an ISO image to a CD-R or a CD-RW
media,
- check the integrity of this new CD,
- delete the ISO image and reboot the laptop using this new CD,
- you are now under the special 'NTFS
Crash Recovery Kit' flavor of Linux. Now, you have to install
the
Linux NTFS environment using the following commands:
install-cdrom
/cdrom/sbin/install-utils
/cdrom/sbin/install-ntfs
- verify that the WXP Pro filesystem can be resized to 17
408 MB using the following command:
ntfsresize
-i /dev/hda1
- now, make a resize test with the following command:
ntfsresize
-n -s17408M /dev/hda1
- if all worked fine, shrink the WXP Pro filesystem:
ntfsresize -s17408M
/dev/hda1
Last, we must resize
the WXP Pro partition:
- execute the following command:
fdisk
/dev/hda
- display the partition table using the following command,
p
- and note the bootable flag '*'
(should be set), the start cylinder (should be '1'), and the filesystem type
(should be '7' for 'HPFS/NTFS') of the '/dev/hda1' partition,
- then, destroy this partition using the following commands (italic
characters are explanations and must not be typed):
d
1 (first partition i.e
'/dev/hda1')
- and create a new one of 17 408 MB using the following
commands:
n
p (primary partition)
1 (first partition
i.e. '/dev/hda1')
1 (start cylinder)
17408M (don't forget the
final 'M' character!)
- change its filesystem type to 'HPFS/NTFS'):
t
1 (first partition
i.e. '/dev/hda1')
7 ('HPFS/NTFS'
partition type)
a
1 (first partition
i.e. '/dev/hda1')
p
- if all appears as it should be, validate the changes (warning:
this command will modify your partition table without making a backup
copy, so,
be sure to know what you are doing before executing it!):
w
You could now reboot the computer using the <CTRL><ALT><DEL>
keyboard combination or using the 'reboot'
command. Don't forget to extract the 'NTFS Crash Recovery Kit' CD and
to store it in a safe place (we never know...). WXP
Pro should show you now a 17408 MB 'C:\'
partition.
Now we have room to install Linux and the shared
'/exchange' partition.
The new partitions
have to be declared during the
Linux installation procedure. Don't forget to NOT MODIFY the WXP Pro ('/dev/hda1') partition layout.
Just add the missing Linux and shared partitions, then choose the proper partition type. And that's all.
After installing
Linux, check your '/boot/grub/grub.conf'
grub configuration file or your '/etc/lilo.conf'
lilo configuration file. It must reflect your multiboot choices. If it
is incomplete, modify it as soon as possible.
If you want the lilo boot manager (not available in
Fedora Core 1), install the 'lilo-22.5.7.2-6mdk'
Mandrake Linux 9.2 package (209 004 bytes) and try to modify the '/etc/lilo.conf'
configuration file with the following example in mind:
select THIS URL
to
obtain my '/etc/lilo.conf'
file.
Also, check
your '/etc/fstab'
file. If it is incomplete, try to modify it with the
following example in mind:
select THIS URL to
obtain
my '/etc/fstab'
file.
Installing
the Fedora Core 1 Linux distribution
Nothing special to say there. No funny things with
IDE, USB, FireWire or ACPI. For the fisrt time since I use RedHat Linux
based distributions on laptops, all the procedure went as expected.
Don't forget
to install the development packages
and kernel development packages.
We will need them later. Also, and sorry for KDE freaks, I use Gnome,
so some examples below are only for Gnome users.
Kernel
I recommend the
vanilla 2.4.22
linux kernel with the Alan Cox AC4 patch. The Fedora Core 1
kernel does not recognize the battery
component of the NX7000. This is due to the fact that the ACPI is not
activated at all on standard Fedora Core 1
kernels.
As an example, check my '/etc/modules.conf'
kernel modules configuration file
Note that some modules are not 2.4.22 standard
kernel drivers. They will be explained later in this document.
The stock installed Fedora Core 1 '/etc/modules.conf'
can be found
If you want to install the vanilla 2.4.22
linux kernel with the Alan Cox AC4 patch, download
the 2.4.22
linux
kernel to your '/usr/src/'
directory from:
Then download
the Alan Cox AC4 patch to
your '/usr/src/'
directory from:
THERE
(2 143 286 bytes)
or from the official FTP site:
Now, uncompress the kernel source tree under '/usr/src/',
create the '/usr/src/linux'
link and patch the kernel source tree with
the following shell commands:
cd /usr/src/
tar xvzf
linux-2.4.22.tar.gz
ln -s linux-2.4.22 linux
cd
linux/
gzip -dc
../patch-2.4.22-ac4.gz | patch -p1
You must now compile
and install the new kernel.
This
is not a simple task for newbies.
You first have to configure your kernel, then
compile
the new kernel image and kernel modules and install them. In order to
use it, you must generate a new 'initrd'
image if you installed Linux with 'ext3fs'
compiled as a kernel module. This is necessary to mount the '/' root file system in the early stage
of the boot sequence, when no kernel module support is available at
this
time. Finally, you must modify the grub
or lilo
configuration file and update the
master boot record of your boot harddrive.
The example below
uses lilo, not
grub. If you want to install lilo, check THIS
part of the documentation.
Start configuring the compilation of the new kernel
by executing the following shell commands:
cd
/usr/src/linux/
make mrproper
If you want to configure your kernel as I did,
download my '/boot/config-2.4.22-ac4'
kernel configuration file to your '/boot'
directory from :
Then execute the folowing shell command, even if you
don't want to use my kernel configuration file :
make menuconfig
Now, the kernel configuration interface will be
presented to
you. If you are familiar with it, choose what you want and save the
configuration file before exiting the interface. Don't forget to select the ACPI support.
If you prefer using the previous downloaded
configuration
file, load the '/boot/config-2.4.22-ac4'
file using the 'Load an Alternate
Configuration File' menu into the kernel configuration
interface. Then save the configuration file before exiting the
interface.
Now, execute the following shell commands:
make dep
make clean
make bzImage
make modules
Then, install the kernel modules and the new kernel:
make
modules_install
cp -a
System.map
/boot/System.map-2.4.22-ac4
unlink /boot/System.map
ln -s /boot/System.map-2.4.22-ac4 /boot/System.map
cp -a .config /boot/config-2.4.22-ac4
cp
-a arch/i386/boot/bzImage /boot/vmlinuz-2.4.22-ac4
If you compiled the
kernel filesystem driver of your '/' root
partition as a module, you
must
create a new 'initrd' image executing the following
shell
command:
mkinitrd
/boot/initrd-2.4.22-ac4.img 2.4.22-ac4
Now, you must add the following lines to the '/etc/lilo.conf'
lilo configuration file in order to validate the changes:
image=/boot/vmlinuz-2.4.22-ac4
label=Fedora-Core-1
initrd=/boot/initrd-2.4.22-ac4.img
append="ro
root=LABEL=/1 hdc=ide-scsi rhgb idebus=66"
(select THIS URL
to
obtain my '/etc/lilo.conf'
modified file)
If you compiled the
kernel filesystem driver of your '/' root
partition as a static part of the
kernel, just remove the 'initrd=...'
line from the '/etc/lilo.conf'
file.
Finally, record
the boot sector modifications
in
the master boot record of your
boot harddrive with the
following
shell command:
lilo
-v
To verify that all works as expected, you must reboot your laptop and select, in
the
'lilo'
boot menu, the 'Fedora-Core-1'
entry. The Linux system should come up after booting the new kernel without any trouble.
To verify
the kernel version in use,
open
a shell command line interface under Gnome and type:
uname
-r
You should obtain:
2.4.22-ac4
To verify
the ACPI version, execute the
following shell command:
cat
/proc/acpi/info
You should obtain:
version:
20030813
states:
S0 S3 S4 S4Bios S5
Now, start the Gnome
battery monitor applet, and check if it indicates the battery power level,
and the state of the external power source.
Power button
The power button does
not work as expected, i.e. as a 'suspend to ram'
switch. The 2.4
Linux kernels do not support 'suspend to ram'
for ACPI laptops (IMHO). As we will see later, hibernation ('suspend to disk')
is more focused to the 2.6 Linux
kernels.
So, what can we do as software pressing this button?
The only thing we can do is power off the Linux system. Thanks to ACPI, the
power button is recognized and can be managed with the user-land 'acpid' daemon.
The 'acpid-1.0.2-5'
package can be already installed in your system (execute 'rpm -q -a | grep
acpid' to check its presence). If not, install it from your
Fedora Core 1 distribution media.
You must now configure the 'acpid'
daemon.
First, move the '/etc/acpi/events/sample.conf'
file to the '/etc/acpi/'
directory.
Second, create a new '/etc/acpi/events/powerbutton-event'
and put in it the following lines:
event=button/power
action=/etc/acpi/actions/powerbutton-action
(select THIS URL to obtain
my '/etc/acpi/events/powerbutton-event'
file)
Last, create a new '/etc/acpi/actions/powerbutton-action'
with some shell commands coding a clean shtudown procedure. If you want
to use my piece of code (focused on the support of Gnome but extensible
to other session managers), copy and paste the following lines:
#!/bin/sh
PIDOF="/sbin/pidof"
GNOMESESSION="/usr/bin/gnome-session"
GNOMESESSIONSAVE="/usr/bin/gnome-session-save"
GNOMESESSIONSAVEARGS="--kill"
XMESSAGE=/usr/bin/X11/xmessage
POWEROFF="/sbin/poweroff"
XF86SERVER="/usr/bin/X11/X"
XF86XAUTHORITY="/var/gdm/:0.Xauth"
PS="/bin/ps"
PSUSERFIELD="1"
CAT="/bin/cat"
GREP="/bin/grep"
CUT="/bin/cut"
PASSWDFILE="/etc/passwd"
PASSWDFILEHOMEDIRFIELD="6"
GFXOK="no"
GNOMEOK="no"
if ( $PIDOF
$XF86SERVER >/dev/null 2>&1 )
then
export
DISPLAY=":0"
if [
-f $XF86XAUTHORITY ];
then
export XAUTHORITY=$XF86XAUTHORITY
fi
PIDOFGNOMESESSION="`$PIDOF $GNOMESESSION`"
if [
$PIDOFGNOMESESSION != "" ];
then
if [ -f $PASSWDFILE ];
then
export
SESSION_MANAGER="local/`hostname`:/tmp/.ICE-unix/$PIDOFGNOMESESSION"
USER="`$PS hu $PIDOFGNOMESESSION | $CUT -d' ' -f$PSUSERFIELD`"
export HOME="`$CAT $PASSWDFILE | $GREP ^$USER: | $CUT -d':'
-f$PASSWDFILEHOMEDIRFIELD`"
GNOMEOK="yes"
fi
fi
GFXOK="yes"
fi
if [ $GFXOK =
"yes" ];
then
if [
$GNOMEOK = "yes" ];
then
exec $GNOMESESSIONSAVE $GNOMESESSIONSAVEARGS
else
$XMESSAGE -timeout 15 -center -buttons Cancel:0,Poweroff:2\
-default Cancel "Poweroff the computer?" >/dev/null 2>&1
if [ $? -eq 2 ];
then
exec $POWEROFF
fi
fi
else
exec
$POWEROFF
fi
#--
(select THIS URL to
obtain my '/etc/acpi/actions/powerbutton-action'
file)
Next, launch
the 'acpid' daemon using the following shell
commands:
chkconfig --level
345 acpid on
/etc/init.d/acpid
start
Finally, test
it by pressing the <power>
button.
XFree86
Graphics
The default Fedora
Core 1 XFree86 distribution works. You should only correct the wrong "
1024x768"
display definition to "
1280x800"
in the '
/etc/X11/XF86Config'
file.
The graphical chipset is identified as a "
ATI Radeon
Mobility M9" card.
If you are not satisfied with the XFree86 builtin
driver, you could use an ATI official Linux driver instead. Just
download the
3.2.8 version of
the guenuine ATI display driver to your '
/usr/src/'
directory from:
or from the ATI web site:
Then install it using the following shell commands:
cd /usr/src/
rpm -Uvh
--force fglrx-glc22-4.3.0-3.2.8.i586.rpm
During the package installation you should see the
execution of a compilation procedure.
If it abnormally aborts, check the '
/usr/src/linux'
link, it must point to the current kernel source directory tree, i.e. '
/usr/src/linux-2.4.22/'.
Then uninstall it ('
rpm -e --nodeps
fglrx-glc22-4.3.0-3.2.8') and retry the previous installation
procedure.
Finally, the installation completes trying to load
the driver kernel module, but it will fail if you are already working
under XWindow. This is normal behaviour.
Now, you have to configure the XWindow configuration
file, telling it to use the new driver and setting other parameters.
You could edit by hand the '
/etc/X11/XF86Config'
file or use the strongly recommended ATI shell utility:
fglrxconfig
First of all,
BACKUP
your original '
/etc/X11/XF86Config'
file as, for example, '
/etc/X11/XF86Config.fedora.orig.save'!
NEVER modify the original XWindow
configuration file by hand or by other means. You have been
warned!
If you want to configure the '
fglrx'
display driver using the '
fglrxconfig'
utility like me, check the following
hardcopy
command dialog ('
<='
indicates '
user
input required'):
==============================================================================
ATI
- FIRE GL - BE THE CREATOR
==============================================================================
This
program will create the ATI "XF86Config-4" file
-
based on your selections - for the below listed boardtypes...
- ATI Radeon 8500 / 9100
- ATI FireGL 8700 / 8800 / E1
- ATI FireGL T2
- ATI Radeon 9000
- ATI Radeon 9200
- ATI Radeon 9500
- ATI Radeon 9600
- ATI Radeon 9700
- ATI Radeon 9800
- ATI FireGL Z1 / X1 / X2
- ATI Mobility M9
- ATI Mobility FireGL 9000
- ATI Mobility M9PLUS
The
"XF86Config-4" file usually resides in /etc/X11.
Press
[Enter] to continue, press 'q'&[Enter] or [Ctrl]+'c' to abort.
<= <return>
==============================================================================
Mouse
==============================================================================
Specify
the mouse port type. Choose one from the following list:
1.
Serial Port
2.
PS/2 or USB with PS/2 protocol
3.
Inport Bus
Enter
the number for your port type: [2] <= <return>
Specify
the mouse model. Choose one from the following list:
1.
PS/2 Mouse (X11 generic ps/2 mouse driver)
2.
PS/2 Wheel Mouse (X11 generic ps/2 wheel mouse driver)
3.
Microsoft Intellimouse (PS2)
4.
Microsoft IntelliMouse Explorer (PS2)
5.
Kensington ThinkingMouse (PS2)
6.
Logitech MouseManPlus (PS2)
7.
Alps Glidepoint PS/2 Touchpad
8.
Genius NetMouse
9.
Genius NetScroll
Enter
the number for your mouse model: [2] <= <return>
If
your mouse has only two buttons, it is recommended that you enable
Emulate3Buttons.
Do you
want to enable Emulate3Buttons (y/n)? [n] <= y
Now
give the full device name that the mouse is connected to, for example
/dev/tty00
or /dev/mouse or /dev/psaux (includes IBM Laptops).
Mouse
device: [/dev/mouse] <= /dev/gpmdata
(see
HERE
for more details)
==============================================================================
Keyboard
==============================================================================
Please
select one of the following keyboard types that is the better
description
of your keyboard. If nothing really matches,
choose
1 (Generic 101-key PC)
1.
Generic 101-key PC
2.
Generic 102-key (Intl) PC
3.
Generic 104-key PC
4.
Generic 105-key (Intl) PC
5.
Dell 101-key PC
6.
Everex STEPnote
7.
Keytronic FlexPro
8.
Microsoft Natural
9.
Northgate OmniKey 101
10.
Winbook Model XP5
11.
Japanese 106-key
12.
PC-98xx Series
Enter
a number to choose the keyboard type: [1] <= 4
Please
select the layout corresponding to your keyboard
1.
U.S. English
2.
U.S. English w/ISO9995-3
3.
Belgian
4.
Bulgarian
5.
Canadian
6.
Czechoslovakian
7.
German
8.
Swiss German
9.
Danish
10.
Spanish
11.
Finnish
12.
French
13.
Swiss French
14.
United Kingdom
15.
Hungarian
16.
Italian
17.
Japanese
18.
Norwegian
Press
[Enter] for the next page or
enter
the number for your keyboard layout country: <= 12 (french
keyboard, select your own country keyboard layout!)
==============================================================================
FireGL
Display Settings
==============================================================================
Quad
Buffer Stereo ("Active Stereo"):
This
driver does support Quad Buffer Stereo ("Active Stereo")
in
combination with a CRT monitor (refresh rate abt. 100 to 120 Hz)
and
the appropiate stereo viewing subsystem hardware. This can be
e.g. a
shutter glasses system (infrared or wired) or an active
polarisation
device paired with passive stereo polarization glasses.
Do you
want to enable "Quad Buffer Stereo" (y/n)? [n] <= <return>
==============================================================================
TV out
Configuration
==============================================================================
Do you
want to enable TV out (y/n)? [n] <= <return>
==============================================================================
FireGL
Screen Layout
==============================================================================
------------------------------------------------------------------------------
|
Maximum resolution for OpenGL
operation
|
|
|
| -
R200 chip family (Radeon 8500-9100 Pro, FireGL
8700/8800/E1):
|
|
2048x2048
|
| -
R300 chip family (Radeon 9500-9700 Pro, FireGL
T2/Z1/X1/X2):
|
|
2560x2560
|
------------------------------------------------------------------------------
Choose
configuration from the list below
1.
Single Head (1 screen, second dark)
2.
Laptop Mode (Ability to toggle between internal /
external screen)
3.
Clone Mode (2 screens - same content)
4.
Big Desktop (2 screens - one framebuffer)
5.
Dual Head (2 screens - two drivers)
Enter
the number for your configuration: [1] <= 2
==============================================================================
Monitor
Settings
==============================================================================
Now we
want to set the specifications of the monitor(s). The two critical
parameters
are the vertical refresh rate, which is the rate at which the
the
whole screen is refreshed, and most importantly the horizontal sync
rate,
which
is the rate at which scanlines are displayed.
The
valid range for horizontal sync and vertical sync should be documented
in the
manual of your monitor. If in doubt, check the monitor database
/usr/X11R6/lib/X11/doc/Monitors
to see if your monitor is there.
Press
[Enter] to continue, press 'q'&[Enter] or [Ctrl]+'c' to abort.
<= <return>
You
must indicate the horizontal sync range of your monitor. You can either
select
one of the predefined ranges below that correspond to industry-
standard
monitor types, or give a specific range.
It is
VERY IMPORTANT that you do not specify a monitor type with a horizontal
sync
range that is beyond the capabilities of your monitor. If in doubt,
choose
a conservative setting.
hsync in kHz; monitor type with characteristic modes
1.
31.5 ; up to 640x480 @
60 Hz (VGA)
2.
31.5 - 37.9; up to 800x600 @ 60 Hz (SVGA)
3.
31.5 - 48.4; up to 1024x768 @ 60 Hz (XGA)
4.
31.5 - 60.0; up to 1024x768 @ 75 Hz (XGA)
5.
31.5 - 68.7; up to 1024x768 @ 85 Hz (XGA)
6.
31.5 - 80.5; up to 1280x1024 @ 75 Hz (SXGA)
7.
31.5 - 91.1; up to 1280x1024 @ 85 Hz (SXGA)
8.
Enter your own horizontal sync range
Enter
your choice (1-8): [1] <= 8
Please
enter the horizontal sync range of your monitor, in the format used
in the
table of monitor types above. You can either specify one or more
continuous
ranges (e.g. 15-25, 30-50), or one or more fixed sync frequencies.
Horizontal
sync range: <= 31.5-70.0
You
must indicate the vertical sync range of your monitor. You can either
select
one of the predefined ranges below or give a specific range.
1.
20 - 60 (e.g. slow scan flat panels with DVI cable)
2.
50 - 70 (VGA)
3.
60 - 75
4.
60 - 85
5.
60 - 100
6.
Specify your own vertical sync range
Enter
your choice: [1] <= 6
Vertical
sync range: <= 50-75
==============================================================================
Display
Modes
==============================================================================
The
default resolution that the server will start-up with will be the first
listed
mode that can be supported by the monitor and card.
Currently
it is set to:
"640x480"
for 24-bit
Modes
that cannot be supported due to monitor or clock constraints will
be
automatically skipped by the server.
1.
Change the modes for 24-bit (24-bit color)
2.
The modes are OK, continue.
Enter
your choice: <= 1
Select
your modes from the following list:
1
"640x480"
2
"800x600"
3
"1024x768"
4
"1152x864"
5
"1280x960"
6
"1280x1024"
7
"1400x1050"
8
"1600x1200"
9
"1792x1344"
Please
list the digits and characters for the modes that you want to use.
For
example, '632' selects "1280x1024" "1024x768" "800x600", with
the
default mode of "1280x1024".
Which
modes do you want? <= 3
(it
will be necessary to correct it by hand using 1280x800 instead!)
The
default resolution that the server will start-up with will be the first
listed
mode that can be supported by the monitor and card.
Currently
it is set to:
"1024x768"
for 24-bit
Modes
that cannot be supported due to monitor or clock constraints will
be
automatically skipped by the server.
1.
Change the modes for 24-bit (24-bit color)
2.
The modes are OK, continue.
Enter
your choice: <= 2
You
can have a virtual screen (desktop), which is screen area that is larger
than
the physical screen and which is panned by moving the mouse to the edge
of the
screen. The largest resolution in the modelist is used for any of the
listed
resolution with less dimensions. Each color depth can have a
differently-sized
virtual screen. Virtual screens resolutions are set
for
each color depth separately.
Note:
This grafics adapter will always select the maximum
x and
y resolution as the default virtual desktop resolution.
This
complies with general X11 specifications. see "man XF86Config".
Do you
want to use a virtual desktop where the dimensions are bigger
than
your maximum x and y screen resolution? (y/n) [n] <= <return>
==============================================================================
Direct
Rendering Interface Restrictions
==============================================================================
Please
specify which restriction sheme you want to implement:
1.
no restrictions - any user has access to the OpenGL ICD
2.
limited to group 'users' - only group members can access the OpenGL ICD
3.
limited to group 'root' - only group members can access the OpenGL ICD
4.
limited to group 'video' - only group members can access the OpenGL ICD
5.
limited to group 'dri' - only group members can access the OpenGL ICD
Enter
the number for your default user restrictions: [1] <= <return>
==============================================================================
Application
Profiles
==============================================================================
Please
select application specific profile:
1.
Default
2.
Individual Configuration of Capabilities
3.
Maya
4.
SOFTIMAGE|XSI
5.
SOFTIMAGE|3D
6.
Houdini 4.0
7.
Houdini 5.0
8.
Houdini 5.5
Enter
the number for your profile: [1] <= <return>
==============================================================================
Advanced
Feature Settings
==============================================================================
Do you
want to initialize xfree86-dga (y/n)? [n] <= <return>
Do you
want to export pseudo color visuals (y/n)? [n] <= <return>
Do you
want to synchronize buffer swaps
with
the vertical sync signal (y/n)? [n] <= y
Full
Scene Anti Aliasing
Do you
want to force multi sample visuals for every OpenGL application? (y/n)?
[n] <= y
Samples
per Pixel (2/4/6)? [6] <= <return>
Disable
FSAA Gamma (y/n)? [n] <= <return>
Customize
FSAA Multi Sample Position (y/n)? [n] <= <return>
TLS
Method: *** this only applys to the FireGL workstation boards ***
The
grafics driver supports two different methods of thread local storage.
The
first method is fast but might immediately abort when used with
WineX,
VM emulators or some other advanced programming tools.
The
second method is up to 10% slower in a few rendering cases
but
does nicely cope with any sort of exotic software.
For
more details on this topic, please see the readme.
If not
totally sure about your needs, then please select "0 - default".
0 - default (FireGL workstation boards: fast)
1 - fast operation (only for standard gnu C/C++ OpenGL applications)
2 - compatible operation (for WineX, VM emulators and some profilers)
Which
storage method do you want to use? [0] <= <return>
External
AGPGART module:
It is
possible (but not recommended) to turn off the usage of
built-in
agp support of the provided fglrx kernel module and
use
the external AGP GART module (agpgart.o) of the Linux kernel.
If you
want to use the external module then ensure that it loads
prior
to the drivers full startup. In order to manually load the
external
agpgart module execute this on the commandline (as root):
/sbin/insmod agpgart
or
alternatively configure your system to auto load the module.
Do you
want to use the external AGP GART module (y/n)? [n] <= <return>
==============================================================================
Finish
==============================================================================
I am
going to write the XF86Config-4 file now. Make sure you don't accidently
overwrite
a previously configured one.
Shall
I write it to '/etc/X11/XF86Config-4' (y/n)? <= y
Probing
PCI bus for a supported graphics device...
found:
M9 (LF)
PCI
bus slot: PCI:1:0:0
entering
the detected PCI bus slot into the XF86Config-4 file.
File
has been written. Take a look at it before running 'startx'.
Note
that the XF86Config-4 file must be in one of the directories
searched
by the server (e.g. /etc/X11) in order to be used.
Within
the server press ctrl, alt and 'Num+' or 'Num-' simultaneously
to
cycle video resolutions.
Pressing
ctrl, alt and backspace simultaneously immediately exits the server.
Use
these keys if the monitor doesn't sync for a particular mode.
For
further configuration, refer to /usr/X11R6/lib/X11/doc/README.Config.
The '
fglrxconfig'
utility creates a new '
/etc/X11/XF86Config-4'
file.
Rename it to '
/etc/X11/XF86Config'
in order to match the Fedora Core 1 XFree86 naming scheme.
Finally, to test the new driver and the new XWindow
configuration file, reboot your computer.
The graphic display should come up, as it came with
the original XFree86 ATI driver.
Then, your '
/var/log/XFree86.0.log'
XFree86 log file should match this one:
Video mode utilities
The following utilities only work with the '
fglrx' ATI
driver. Do not use them with the native XFree86 ATI/radeon driver!
ATI utility
ATI provides a
graphical utility called '
fireglcontrol'
to modify some video modes related to a second monitor or to set the
gamma correction (useful for DVD playback). You must first execute the
following command to complete its installation:
cd /usr/bin/X11/
ln -s
fireglcontrol.qt3.gcc3.2 fireglcontrol
You will find
HERE
a snapshop of this utility.
Unfortunately, there are more interesting parameters
that cannot be set without the need of editing by hand the '
/etc/X11/XF86Config'
file.
My utility
I spent some time in
coding another utility for my own needs. It is capable of setting
standard, mirror, extended and virtual video modes (as root or as a
normal user). It uses pre-defined XF86Config files and can be easily
adapted/extended for your special needs. It is crappy shell programing,
but
it works like a charm.
You will find
HERE a snapshot of this
utility.
If you want to take advantage of it, download the
archive in your '
/usr/src/'
directory
from:
Then, execute the following shell commands:
cd /usr/src/
tar xvzf
switchativideomode.tar.gz
cp -a
usr_bin_switchativideomode /usr/bin/switchativideomode
cp -a
usr_sbin_switchativideomode /usr/sbin/switchativideomode
cp -a
usr_sbin_switchativideomode.txt /usr/sbin/switchativideomode.txt
cp -a
XF86Config-fglrx-* /etc/X11/
If you want to install it not only for the root
user, execute the following shell commands:
cp -a
etc_pam.d_switchativideomode /etc/pam.d/switchativideomode
cp -a
etc_security_console.apps_switchativideomode
/etc/security/console.apps/switchativideomode
If you want to integrate it in the Gnome preferences
menu, execute the following commands:
cp -a
usr_share_applications_switchativideomode.desktop
/usr/share/applications/switchativideomode.desktop
cp -a
usr_share_pixmaps_switchativideomode.png
/usr/share/pixmaps/switchativideomode.png
If you want to validate the video mode changes
without the need of rebooting your laptop (you still will need to close
your Gnome session), try the following shell commands:
cp
-a /etc/X11/gdm/gdm.conf /etc/X11/gdm/gdm.conf.fedora.orig.save
cp -a etc_X11_gdm_gdm.conf /etc/X11/gdm/gdm.conf
Then, remove the archive files:
cd /usr/src/
rm -rf
switchativideomode/
rm -f switchativideomode.tar.gz
And last,
after a
reboot, try the '
switchativideomode'
command in a shell console or in the preferences Gnome menu and enjoy!
Remarks:
I could not successfully test the TV
video modes.
I could not successfully test the 16/10 extended video modes (they
worked with RH 9 and the 3.2.5 version of the driver, but not with
Fedora Core 1 and the 3.2.8 version of the driver!).
Nevertheless, the pre-defined XFree86 configuration files for all these
not working video modes are installed under the '/etc/X11/'
directory
and the 'switchativideomode'
code part attached to their management is still there, but
desactivated. It is very simple to reactivate all these video modes and
check if they work for you.
DRI
The DRI XFree86
interface
works with the
native XFree86 radeon driver or the '
fglrx' ATI
driver. Ironically, the first seems to be faster, but you have more
control over the official ATI driver.
In addition, I encountered more bugs (several frozen
display situations) with the XFree86 native driver. So I use the ATI
official driver.
To check if the DRI acceleration part of the display
driver is activated, execute the following command:
glxinfo
You should obtain:
name of
display: :0.0
display: :0 screen: 0
direct rendering: Yes
...
and try it with:
glxgears
You should obtain, in full screen window mode
(1280x800x24), a fps
rate of
60 for a
1.4
GHz HP Compag NX7000 laptop.
Keyboard
Standard keys
The keyboard works well for all the
standard keys, in console or in XWindow mode, without using special
configuration hints.
VGA
video out control key (<fn><f4>)
The key works under console mode but not
under XWindow. The VGA output is
activated at boot time by the BIOS. You can plug a CRT and it works,
but
with a low refresh rate. You cannot control the refresh rate. The key
cannot be trapped under XWindow (no keycode associated with it).
Any hint appreciated.
Suspend
to disk (hibernation) control key (<fn><f5>)
The
key does not work. In fact, no
keycode is generated under XWindow when you press it. In addition, '
suspend to disk'
on ACPI laptops, like the HP Compaq NX7000, is not supported in
hardware (IMHO).
A
kernel patch and a
script shell exist for making a '
suspend to disk'
with
software, but the project
is more focused to
2.6.x
kernels. You can check it at:
LCD
brightness control keys (<fn><f7>
and <fn><f8>)
These keys work well, in console or in
XWindow mode, without using special configuration hints. It seems that
they are hardware wired to the LCD brightness controller.
Other
special control keys
XWindow generates
keycodes for the
<fn><f3>
('
www'),
the
<fn><f6>
('
screenlock'),
the
<fn><f9>
('
play/pause'),
<fn><f10>
('
stop'),
<fn><f11>
('
previous
track') and the
<fn><f12>
('
next track')
keys. In addition, the three
sound volume control
buttons (volume up, volume down, mute/unmute) generate keycodes too.
These keycodes can be obtained using the '
/usr/bin/X11/xev'
XWindow tool. For your convenience, here are the keycodes for these
special keys:
- 178 ('www')
- 115 ('screenlock')
- 162 ('play/pause')
- 164 ('stop')
- 144 ('previous track')
- 153 ('next track')
- 176 ('volume up')
- 174 ('volume down')
- 160 ('mute/unmute')
In order to make these keys fully functional you
have to
assign actions to
these
keycodes . 2 methods
exist for that purpose.
The first one consists of assigning (
mapping) a
keysym (XWindow terminology) to a
keycode. A keysym is a symbol that
means an action like '
display the
euro character'. For that purpose, you can use the following
XWindow configuration file:
/etc/X11/Xmodmap
For example, if you want to assign the '
F1'
symbol to the '
help'
key, in order to launch the
Gnome
contextual help (or another contextual help if supported by the
running application), you have to add the following line at the end of
the
Xmodmap file:
keycode 240 = F1
In fact, this functionality is already coded in
XWindow and Gnome associates its contextual help program to the F1
keysym.
But how to
launch
applications or
shell scripts
pressing a
special control key?
Fortunately, several utilities can do
this job. And '
hotkeys'
is one of them. Installing it consists of
downloading the following RPMs in
your '
/usr/src/'
directory from:
or from:
and
installing
them with the following shell commands:
cd /usr/src/
rpm -Uvh
db3-3.3.11-6.i386.rpm
rpm -Uvh
xosd-0.7.0-fr3.i386.rpm
rpm -Uvh
hotkeys-0.5.5-2.i386.rpm
rm -f *.rpm
Now, we have to
configure
'
hotkeys'.
If, you want to
- launch 'mozilla'
when pressing the 'www' key,
- launch 'xlocknew'
(an 'xlock'
wrapper command described in the 'Screenlock'
section of this document) when pressing the 'screenlock'
key,
- launch and control 'xmms' when
pressing the 'play/pause',
'stop',
'previous
track' and 'next track'
keys,
- manage the volume settings when pressing the 'volume up',
'volume down'
and 'mute/unmute'
keys,
then, you should
modify
the '
/etc/hotkeys.conf'
file like that:
Kbd=hpcompaqnx7000
CDROM=none
PrevTrack=xmms --rew
Play=xmms --play
Stop=xmms --pause
NextTrack=xmms --fwd
WebBrowser=mozilla
ScreenSaver=xlocknew
(select
THIS
URL to
obtain my '
/etc/hotkeys.conf'
modified file)
and you should
create
a '
/usr/share/hotkeys/hpcompaqnx7000.def'
file like that:
<?xml
version="1.0"?>
<config model="HP Compaq NX7000 Keyboard">
<PrevTrack keycode="144"/>
<Play
keycode="162"/>
<Stop
keycode="164"/>
<NextTrack keycode="153"/>
<VolUp
keycode="176" adj="2"/>
<VolDown
keycode="174" adj="2"/>
<Mute
keycode="160"/>
<WebBrowser keycode="178"/>
<Sleep
keycode="223"/>
<ScreenSaver keycode="115"/>
</config>
(select
THIS URL to
obtain
my '
/usr/share/hotkeys/hpcompaqnx7000.def'
keyboard definition file for '
hotkeys')
Last, in order to
automatically
launch the '
hotkeys'
daemon when you login into the XWindow session manager,
create a '
/etc/X11/xinit/xinitrc.d/hotkeys'
shell script file like this one:
#! /bin/sh
if [ -x
/usr/bin/hotkeys ];
then
/usr/bin/hotkeys -b
fi
(select
THIS URL to obtain
my '
/etc/X11/xinit/xinitrc.d/hotkeys'
shell script file)
Don't forget
to make it executable with the following shell command:
chmod 755
/etc/X11/xinit/xinitrc.d/hotkeys
Now, to test the whole thing, just
open a new XWindow session and
press the '
www'
key. If '
mozilla'
launches, all works as expected.
Then, you can play with the volume up/down special keys and see the
great OSD volume level on your screen.
Mouse pad
It
works like a charm under XWindow,
including the
above located
switch button
and the
scroll pad.
I modified the '
/etc/init.d/gpm'
and '
/etc/X11/XF86Config'
configuration files in order to make the mouse pad work in XWindow and
console mode simultaneously.
'
/etc/init.d/gpm'
modification:
...
#
if [ -n "$MOUSETYPE" ]; then
#
daemon gpm -m $DEVICE -t $MOUSETYPE
#
else
#
daemon gpm -m $DEVICE
#
fi
daemon gpm -m /dev/mouse -t imps2 -Rraw
...
(select
THIS
URL to obtain my '
/etc/init.d/gpm'
modified file)
'
/etc/X11/XF86Config'
modification:
...
Option "Protocol" "IMPS/2"
#
Option "Device" "/dev/psaux"
Option "Device" "/dev/gpmdata"
Option "ZAxisMapping" "4 5"
Option "Emulate3Buttons" "yes"
...
(select
THIS
URL to obtain my '
/etc/X11/XF86Config'
modified file)
Then,
reboot
your laptop, open a new XWindow session, and try the mouse pad in
console and graphic modes. Now, it must be fully functional without any
trouble.
Mouse
An external mouse can be connected to
a USB connector and it should
work as expected.
You have to note that the XFree86 configuration file
(found in this document) expects a wheel
mouse. if you plug a simple mouse, don't forget to modify the
'/etc/X11/XF86Config'
changing the mouse protocol entry from 'IMPS/2'
to 'PS/2'.
If you want to desactivate the mouse pad, use the
mouse pad switch button.
Screenlock
This
section
is
optional if you
don't want a
screenlock when you work
as root under XWindow.
The default XWindow screenlock '
xscreensaver'
does not work when you are
super-user. This is a design
feature, not a bug (check '
http://www.jwz.org/xscreensaver/'
for more details).
Unfortunately, there is no workaround using the
default '
xscreensaver'
shell command.
To avoid this behaviour, you need a
new program, '
xlockmore'.
Download the associated RPM
packages in your '
/usr/src/'
directory from:
or from:
Then
install
them with te following shell commands:
cd /usr/src/
rpm -Uvh
fortune-mod-1.0-31mdk.i586.rpm
rpm
-Uvh xlockmore-5.08-2mdk.i586.rpm
rm -f *.rpm
Now, we need
a
wrapper that will launch the '
xlock'
command when logged as '
root' or
the '
xscreensaver'
command when not. So,
create
the following '
/usr/bin/xlock.wrapper'
shell script file:
#!/bin/sh
# Source function library
. /etc/init.d/functions
XLOCK="/usr/bin/xlock"
XLOCKSCREENSAVER="atlantis"
XSCREENSAVER="/usr/X11R6/bin/xscreensaver"
XSCREENSAVERARGS="-no-splash"
XSCREENSAVERCOMMAND="/usr/X11R6/bin/xscreensaver-command"
RETVAL=0
USER=`id -u`
if [ $USER -eq 0 ]; then
{
if [ -x $XLOCK ]; then
{
exec $XLOCK -mode $XLOCKSCREENSAVER >/dev/null
2>&1
}
fi
}
else
{
if [ -x $XSCREENSAVERCOMMAND ]; then
{
pidof $XSCREENSAVER >/dev/null 2>&1
RETVAL=$?
if [ $RETVAL != 0 ]; then
{
if [ -x $xscreensaver ]; then
{
$XSCREENSAVER
$XSCREENSAVERARGS >/dev/null 2>&1
RETVAL=$?
}
fi
}
fi
[ $RETVAL == 0 ] && exec
$XSCREENSAVERCOMMAND -lock >/dev/null 2>&1
}
fi
}
fi
#--
(select
THIS
URL to obtain my '
/usr/bin/xlock.wrapper'
file)
Don't forget
to
make it executable with the
following shell command:
chmod 755
/usr/bin/xlock.wrapper
Now
make
the
following
symbolic links:
ln -s
/usr/games/fortune /usr/bin/fortune
ln -s
/usr/bin/xlock.wrapper /usr/bin/xlocknew
Finally,
test
the new screenlock functionality when logged as '
root'
pressing the '
screenlock'
special control key if you activated the '
hotkeys'
daemon or executing the '
xlocknew'
shell command.
Wired ethernet network
It works
from stock installation. But the driver is not optimised for the NX7000
ethernet
chipset. You should modify the 'eth0' entry
in the '/etc/module.conf'
configuration file.
'/etc/modules.conf'
modification:
#alias eth0 8139too
alias eth0
8139cp
(select THIS
URL to obtain my '/etc/modules.conf'
modified file)
Test it rebooting
the laptop. Then, try the following shell command:
lsmod | grep 8139cp
You should obtain:
8139cp
16264 1
Wireless ethernet network
The Intel Centrino builtin mini-pci Wi-Fi card does not work from stock Fedora Core 1
installation.
Intel is working
on a driver, but today there is nothing around the corner. You
can track its hypothetic availability
using the following URL:
There is an
alternative driver called 'DriverLoader' but it is not free and costs 20$.
The team behind this great piece of software is Linuxant:
I have tested
this driver with Cisco Aironet Wi-Fi
bridges using WEP encryption
and VLANs: all worked without any trouble during several weeks. The package
installation is simple (to complete the installation, use the network
configuration GUI tool available in the Gnome system parameters menu)
and the service provided by the Linuxant team is of a great value.
For your convenience, you will find below an example
of a '/etc/sysconfig/network-scripts/ifcfg-eth1'
Wi-Fi interface configuration file created with the network
configuration GUI tool:
USERCTL=yes
PEERDN=yes
GATEWAY=
ONBOOT=yes
TYPE=Wireless
DHCP_HOSTNAME=
IPADDR=
DEVICE=eth1
HWADDR=XX:YY:ZZ:XX:YY:XX
BOOTPROTO=dhcp
DOMAIN=
NETMASK=
ESSID=XXYYZZXXYYZZ
CHANNEL=11
MODE=Managed
KEY=XXYYZZXXYYZZXXYYZZXXYYZZXX
RATE=11Mb/s
So if you want
Wi-Fi support now, buy this 20$ driver and support the Linuxant team.
AMR modem
Like many others, this softmodem is not supported by Fedora Core 1.
Fortunately, the Smart
Link Ltd. firm provides an unsupported driver that works like a
charm with the NX7000 internal AMR modem.
To install it, just download
the driver in your '/usr/src/'
directory from:
or from:
Next, uncompress the archive:
cd /usr/src/
tar xvzf
slmdm-2.7.10.tar.gz
cd
slmdm-2.7.10/
Now, check if your country is supported with the 'slver'
shell command located in the '/usr/src/slmdm-2.7.10/'
directory:
./slver --country
Then, note your
country name (not the code), build and install the kernel driver
using the following shell commands:
make
make
install-amr
cd ..
rm -rf slmdm-2.7.10/
Now, you must configure the fresh installed modem
driver. Check if the following lines appear in the '/etc/modules.conf'
configuration file:
alias
char-major-212 slmodem
alias slmodem
slamrmo
(select THIS
URL to obtain my '/etc/modules.conf'
modified file)
Then, add the following lines to it, replacing the 'FRANCE'
string by your country name,
as noted before:
options slmdm
country=FRANCE
alias ppp0
ppp_generic
Last, check that the '/dev/modem'
link is pointing to the '/dev/ttySL0'
special file.
To test your device you must configure a new PPP
connection reflecting your ISP account parameters. The easy way
consists of using the network
configuration GUI tool available in the Gnome system parameters menu.
Use the modem lights Gnome applet to initiate/abort
your PPP connection. And that's all!
IDE
It works great activating DMA on the internal hardisk and
combo drive. Check the DMA activation using the following shell
commands:
hdparm
-d /dev/hda
hdparm
-d /dev/hdc
You should obtain:
/dev/hda:
using_dma
= 1 (on)
and
/dev/hdc:
using_dma
= 1 (on)
If you want, you can add the following kernel
command line parameter in your '/etc/lilo.conf'
configuration file in order to tell Linux that you have a 66 MHz
IDE bus:
append="ro root=LABEL=/1
hdc=ide-scsi rhgb idebus=66"
(select THIS URL
to
obtain my '/etc/lilo.conf'
modified file)
Don't forget to validate the modification using the
following 'lilo'
command:
lilo -v
To test that it works, reboot your computer and execute the
following shell command:
dmesg | grep
idebus=66
You should obtain:
ide_setup: idebus=66
PCMCIA and CardBus
In order to correct a little problem in the '/etc/init.d/pcmcia'
startup script, you should apply a patch to it. Download the following
patch file to your '/etc/init.d/'
directory from:
THERE
(552 bytes)
and then apply it using these shell commands:
cd /etc/init.d/
cp -a pcmcia
pcmcia.fedora.orig.save
patch -p0
< etc_init.d_pcmcia.patch
(select THIS
URL to obtain my '/etc/init.d/pcmcia'
patched file)
Then, restart the pcmcia service:
/etc/init.d/pcmcia
restart
Now, the driver kernel modules should be loaded.
Check them with the following shell command:
lsmod | grep pcmcia
You should obtain:
pcmcia_core
54272 0 [ds yenta_socket]
The drivers have not been tested due to lack of
PCMCIA/CardBus hardware.
Sound
It works
from stock Fedora Core 1 installation. No need to install ALSA. Of
course,
you can install it if you need it.
USB 1.1 and 2.0
It works
from stock installation too. It has been tested with a wheel mouse (USB
1.1), with a 4x DVD recorder (USB 2.0) burning more than 150 2x DVD-R
and with a flash memory key (USB 2.0).
IEEE 1394a
It works
from stock installation. It has been tested with a 3rd generation 15
GBApple iPod used as a mass storage device.
If you encounter difficulties with some IEEE 1394
devices (like mass storage peripherals), try to download the following
shell utility to the '/usr/sbin/'
directory:
Don't forget
to make it executable with the
following shell command:
chmod 755
/usr/sbin/rescan-scsi-bus.sh
Then, plug your IEEE 1394a device and execute as root the previous command:
rescan-scsi-bus.sh
Y/C
I tried to make it work but I failed.
Any hint
appreciated.
Fast InfraRed
Not tested.
But it should work with the stock Fedora Core 1 drivers.
SD Card
There is no Linux
support for SD card these days (IMHO). It should be related to
license constraints. Check the following URL for more details:
GNU Free Documentation
License
Version 1.2, November 2002
Copyright (C) 2000,2001,2002  Free Software Foundation, Inc.
59 Temple Place, Suite 330, Boston, MA  02111-1307  USA
Everyone is permitted to copy and distribute verbatim copies
of this license document, but changing it is not allowed.
0. PREAMBLE
The purpose of this License is to make a manual, textbook, or other
functional and useful document "free" in the sense of freedom: to
assure
everyone the effective freedom to copy and redistribute it, with or
without modifying it, either commercially or noncommercially.
Secondarily, this License preserves for the author and publisher a way
to get credit for their work, while not being considered responsible
for
modifications made by others.
This License is a kind of "copyleft", which means that derivative
works of the document must themselves be free in the same sense. It
complements the GNU General Public License, which is a copyleft license
designed for free software.
We have designed this License in order to use it for manuals for
free software, because free software needs free documentation: a free
program should come with manuals providing the same freedoms that the
software does. But this License is not limited to software manuals; it
can be used for any textual work, regardless of subject matter or
whether it is published as a printed book. We recommend this License
principally for works whose purpose is instruction or reference.
1. APPLICABILITY AND DEFINITIONS
This License applies to any manual or other work, in any medium,
that contains a notice placed by the copyright holder saying it can be
distributed under the terms of this License. Such a notice grants a
world-wide, royalty-free license, unlimited in duration, to use that
work under the conditions stated herein. The "Document", below, refers
to any such manual or work. Any member of the public is a licensee, and
is addressed as "you". You accept the license if you copy, modify or
distribute the work in a way requiring permission under copyright law.
A "Modified Version" of the Document means any work containing the
Document or a portion of it, either copied verbatim, or with
modifications and/or translated into another language.
A "Secondary Section" is a named appendix or a front-matter section
of the Document that deals exclusively with the relationship of the
publishers or authors of the Document to the Document's overall subject
(or to related matters) and contains nothing that could fall directly
within that overall subject. (Thus, if the Document is in part a
textbook of mathematics, a Secondary Section may not explain any
mathematics.) The relationship could be a matter of historical
connection with the subject or with related matters, or of legal,
commercial, philosophical, ethical or political position regarding
them.
The "Invariant Sections" are certain Secondary Sections whose
titles
are designated, as being those of Invariant Sections, in the notice
that
says that the Document is released under this License. If a section
does not fit the above definition of Secondary then it is not allowed
to
be designated as Invariant. The Document may contain zero Invariant
Sections. If the Document does not identify any Invariant Sections then
there are none.
The "Cover Texts" are certain short passages of text that are
listed, as Front-Cover Texts or Back-Cover Texts, in the notice that
says that the Document is released under this License. A Front-Cover
Text may be at most 5 words, and a Back-Cover Text may be at most 25
words.
A "Transparent" copy of the Document means a machine-readable copy,
represented in a format whose specification is available to the general
public, that is suitable for revising the document straightforwardly
with generic text editors or (for images composed of pixels) generic
paint programs or (for drawings) some widely available drawing editor,
and that is suitable for input to text formatters or for automatic
translation to a variety of formats suitable for input to text
formatters. A copy made in an otherwise Transparent file format whose
markup, or absence of markup, has been arranged to thwart or discourage
subsequent modification by readers is not Transparent. An image format
is not Transparent if used for any substantial amount of text. A copy
that is not "Transparent" is called "Opaque".
Examples of suitable formats for Transparent copies include plain
ASCII without markup, Texinfo input format, LaTeX input format, SGML or
XML using a publicly available DTD, and standard-conforming simple
HTML,
PostScript or PDF designed for human modification. Examples of
transparent image formats include PNG, XCF and JPG. Opaque formats
include proprietary formats that can be read and edited only by
proprietary word processors, SGML or XML for which the DTD and/or
processing tools are not generally available, and the machine-generated
HTML, PostScript or PDF produced by some word processors for output
purposes only.
The "Title Page" means, for a printed book, the title page itself,
plus such following pages as are needed to hold, legibly, the material
this License requires to appear in the title page. For works in formats
which do not have any title page as such, "Title Page" means the text
near the most prominent appearance of the work's title, preceding the
beginning of the body of the text.
A section "Entitled XYZ" means a named subunit of the Document
whose
title either is precisely XYZ or contains XYZ in parentheses following
text that translates XYZ in another language. (Here XYZ stands for a
specific section name mentioned below, such as "Acknowledgements",
"Dedications", "Endorsements", or "History".) To "Preserve the Title"
of such a section when you modify the Document means that it remains a
section "Entitled XYZ" according to this definition.
The Document may include Warranty Disclaimers next to the notice
which states that this License applies to the Document. These Warranty
Disclaimers are considered to be included by reference in this License,
but only as regards disclaiming warranties: any other implication that
these Warranty Disclaimers may have is void and has no effect on the
meaning of this License.
2. VERBATIM COPYING
You may copy and distribute the Document in any medium, either
commercially or noncommercially, provided that this License, the
copyright notices, and the license notice saying this License applies
to
the Document are reproduced in all copies, and that you add no other
conditions whatsoever to those of this License. You may not use
technical measures to obstruct or control the reading or further
copying
of the copies you make or distribute. However, you may accept
compensation in exchange for copies. If you distribute a large enough
number of copies you must also follow the conditions in section 3.
You may also lend copies, under the same conditions stated above,
and you may publicly display copies.
3. COPYING IN QUANTITY
If you publish printed copies (or copies in media that commonly
have
printed covers) of the Document, numbering more than 100, and the
Document's license notice requires Cover Texts, you must enclose the
copies in covers that carry, clearly and legibly, all these Cover
Texts:
Front-Cover Texts on the front cover, and Back-Cover Texts on the back
cover. Both covers must also clearly and legibly identify you as the
publisher of these copies. The front cover must present the full title
with all words of the title equally prominent and visible. You may add
other material on the covers in addition. Copying with changes limited
to the covers, as long as they preserve the title of the Document and
satisfy these conditions, can be treated as verbatim copying in other
respects.
If the required texts for either cover are too voluminous to fit
legibly, you should put the first ones listed (as many as fit
reasonably) on the actual cover, and continue the rest onto adjacent
pages.
If you publish or distribute Opaque copies of the Document
numbering
more than 100, you must either include a machine-readable Transparent
copy along with each Opaque copy, or state in or with each Opaque copy
a
computer-network location from which the general network-using public
has access to download using public-standard network protocols a
complete Transparent copy of the Document, free of added material. If
you use the latter option, you must take reasonably prudent steps, when
you begin distribution of Opaque copies in quantity, to ensure that
this
Transparent copy will remain thus accessible at the stated location
until at least one year after the last time you distribute an Opaque
copy (directly or through your agents or retailers) of that edition to
the public.
It is requested, but not required, that you contact the authors of
the Document well before redistributing any large number of copies, to
give them a chance to provide you with an updated version of the
Document.
4. MODIFICATIONS
You may copy and distribute a Modified Version of the Document
under
the conditions of sections 2 and 3 above, provided that you release the
Modified Version under precisely this License, with the Modified
Version
filling the role of the Document, thus licensing distribution and
modification of the Modified Version to whoever possesses a copy of it.
In addition, you must do these things in the Modified Version:
- A. Use in the Title Page (and on the covers, if
any) a title distinct from that of the Document, and from those of
previous versions (which should, if there were any, be listed in the
History section of the Document). You may use the same title as a
previous version if the original publisher of that version gives
permission.
- B. List on the Title Page, as authors, one or
more persons or entities responsible for authorship of the
modifications in the Modified Version, together with at least five of
the principal authors of the Document (all of its principal authors,
if it has fewer than five), unless they release you from this
requirement.
- C. State on the Title page the name of the
publisher of the Modified Version, as the publisher.
- D. Preserve all the copyright notices of the
Document.
- E. Add an appropriate copyright notice for your
modifications adjacent to the other copyright notices.
- F. Include, immediately after the copyright
notices, a license notice giving the public permission to use the
Modified Version under the terms of this License, in the form shown
in the Addendum below.
- G. Preserve in that license notice the full
lists
of Invariant Sections and required Cover Texts given in the
Document's license notice.
- H. Include an unaltered copy of this License.
- I. Preserve the section Entitled "History",
Preserve its Title, and add to it an item stating at least the title,
year, new authors, and publisher of the Modified Version as given on
the Title Page. If there is no section Entitled "History" in the
Document, create one stating the title, year, authors, and publisher
of the Document as given on its Title Page, then add an item
describing the Modified Version as stated in the previous sentence.
- J. Preserve the network location, if any, given
in the Document for public access to a Transparent copy of the
Document, and likewise the network locations given in the Document
for previous versions it was based on. These may be placed in the
"History" section. You may omit a network location for a work that
was published at least four years before the Document itself, or if
the original publisher of the version it refers to gives permission.
- K. For any section Entitled "Acknowledgements"
or
"Dedications", Preserve the Title of the section, and preserve in the
section all the substance and tone of each of the contributor
acknowledgements and/or dedications given therein.
- L. Preserve all the Invariant Sections of the
Document, unaltered in their text and in their titles. Section numbers
or the equivalent are not considered part of the section titles.
- M. Delete any section Entitled "Endorsements".
Such a section may not be included in the Modified Version.
- N. Do not retitle any existing section to be
Entitled "Endorsements" or to conflict in title with any Invariant
Section.
- O. Preserve any Warranty Disclaimers.
If the Modified Version includes new front-matter sections or
appendices that qualify as Secondary Sections and contain no material
copied from the Document, you may at your option designate some or all
of these sections as invariant. To do this, add their titles to the
list of Invariant Sections in the Modified Version's license notice.
These titles must be distinct from any other section titles.
You may add a section Entitled "Endorsements", provided it contains
nothing but endorsements of your Modified Version by various
parties--for example, statements of peer review or that the text has
been approved by an organization as the authoritative definition of a
standard.
You may add a passage of up to five words as a Front-Cover Text,
and
a passage of up to 25 words as a Back-Cover Text, to the end of the
list
of Cover Texts in the Modified Version. Only one passage of Front-Cover
Text and one of Back-Cover Text may be added by (or through
arrangements
made by) any one entity. If the Document already includes a cover text
for the same cover, previously added by you or by arrangement made by
the same entity you are acting on behalf of, you may not add another;
but you may replace the old one, on explicit permission from the
previous publisher that added the old one.
The author(s) and publisher(s) of the Document do not by this
License give permission to use their names for publicity for or to
assert or imply endorsement of any Modified Version.
5. COMBINING DOCUMENTS
You may combine the Document with other documents released under
this License, under the terms defined in section 4 above for modified
versions, provided that you include in the combination all of the
Invariant Sections of all of the original documents, unmodified, and
list them all as Invariant Sections of your combined work in its
license
notice, and that you preserve all their Warranty Disclaimers.
The combined work need only contain one copy of this License, and
multiple identical Invariant Sections may be replaced with a single
copy. If there are multiple Invariant Sections with the same name but
different contents, make the title of each such section unique by
adding
at the end of it, in parentheses, the name of the original author or
publisher of that section if known, or else a unique number. Make the
same adjustment to the section titles in the list of Invariant Sections
in the license notice of the combined work.
In the combination, you must combine any sections Entitled
"History"
in the various original documents, forming one section Entitled
"History"; likewise combine any sections Entitled "Acknowledgements",
and any sections Entitled "Dedications". You must delete all sections
Entitled "Endorsements."
6. COLLECTIONS OF DOCUMENTS
You may make a collection consisting of the Document and other
documents released under this License, and replace the individual
copies
of this License in the various documents with a single copy that is
included in the collection, provided that you follow the rules of this
License for verbatim copying of each of the documents in all other
respects.
You may extract a single document from such a collection, and
distribute it individually under this License, provided you insert a
copy of this License into the extracted document, and follow this
License in all other respects regarding verbatim copying of that
document.
7. AGGREGATION WITH INDEPENDENT WORKS
A compilation of the Document or its derivatives with other
separate
and independent documents or works, in or on a volume of a storage or
distribution medium, is called an "aggregate" if the copyright
resulting
from the compilation is not used to limit the legal rights of the
compilation's users beyond what the individual works permit. When the
Document is included in an aggregate, this License does not apply to
the
other works in the aggregate which are not themselves derivative works
of the Document.
If the Cover Text requirement of section 3 is applicable to these
copies of the Document, then if the Document is less than one half of
the entire aggregate, the Document's Cover Texts may be placed on
covers
that bracket the Document within the aggregate, or the electronic
equivalent of covers if the Document is in electronic form. Otherwise
they must appear on printed covers that bracket the whole aggregate.
8. TRANSLATION
Translation is considered a kind of modification, so you may
distribute translations of the Document under the terms of section 4.
Replacing Invariant Sections with translations requires special
permission from their copyright holders, but you may include
translations of some or all Invariant Sections in addition to the
original versions of these Invariant Sections. You may include a
translation of this License, and all the license notices in the
Document, and any Warranty Disclaimers, provided that you also include
the original English version of this License and the original versions
of those notices and disclaimers. In case of a disagreement between the
translation and the original version of this License or a notice or
disclaimer, the original version will prevail.
If a section in the Document is Entitled "Acknowledgements",
"Dedications", or "History", the requirement (section 4) to Preserve
its
Title (section 1) will typically require changing the actual title.
9. TERMINATION
You may not copy, modify, sublicense, or distribute the Document
except as expressly provided for under this License. Any other attempt
to copy, modify, sublicense or distribute the Document is void, and
will
automatically terminate your rights under this License. However,
parties who have received copies, or rights, from you under this
License
will not have their licenses terminated so long as such parties remain
in full compliance.
10. FUTURE REVISIONS OF THIS LICENSE
The Free Software Foundation may publish new, revised versions of
the GNU Free Documentation License from time to time. Such new versions
will be similar in spirit to the present version, but may differ in
detail to address new problems or concerns. See
http://www.gnu.org/copyleft/.
Each version of the License is given a distinguishing version
number. If the Document specifies that a particular numbered version of
this License "or any later version" applies to it, you have the option
of following the terms and conditions either of that specified version
or of any later version that has been published (not as a draft) by the
Free Software Foundation. If the Document does not specify a version
number of this License, you may choose any version ever published (not
as a draft) by the Free Software Foundation.
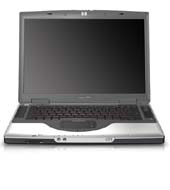
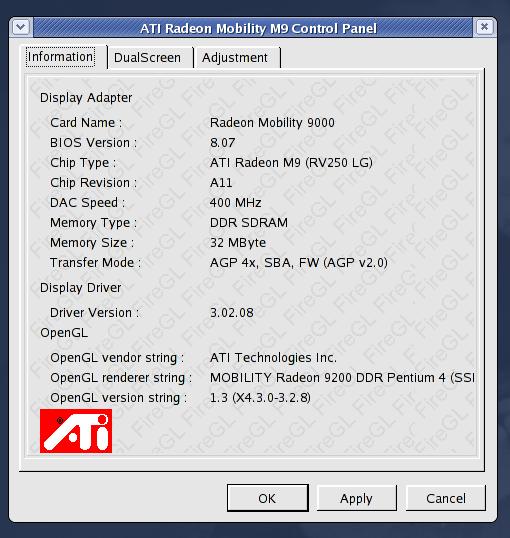
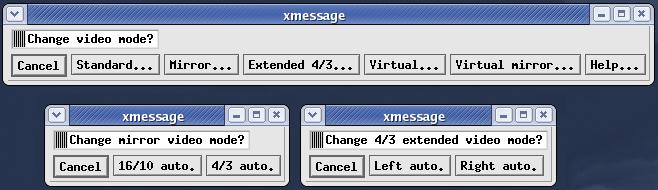